

TightVNC is a priceless open-source remote desktop control application that allows users to connect to remote desktops. Through TightVNC you can see and access remote located machines/system from your local system. It’s useful in administration, Technical support, Remote assistance and any other purpose like troubleshoot your colleague, friend’s system problem. In this article you will learn to install and configure TightVNC on centos server.
Install the X window system on your system
Install and configure tightvnc
Loaded plugins: fastestmirror, refresh-packagekit
* base: mirror.nbrc.ac.in
* extras: mirror.nbrc.ac.in
* updates: mirror.nbrc.ac.in
Setting up Install Process
Resolving Dependencies
–> Running transaction check
—> Package tigervnc-server.x86_64 0:1.1.0-8.el6_5 will be installed
–> Processing Dependency: xorg-x11-xkb-utils for package: tigervnc-server-1.1.0-8.el6_5.x86_64
–> Processing Dependency: xorg-x11-xauth for package: tigervnc-server-1.1.0-8.el6_5.x86_64
–> Finished Dependency ResolutionDependencies Resolved
======================================================================================================================================
Package Arch Version Repository Size
======================================================================================================================================
Installing:
tigervnc-server x86_64 1.1.0-8.el6_5 updates 1.1 M
Installing for dependencies:
libfontenc x86_64 1.0.5-2.el6 base 24 k
libxkbfile x86_64 1.0.6-1.1.el6 base 74 k
xkeyboard-config noarch 2.6-6.el6 base 715 k
xorg-x11-font-utils x86_64 1:7.2-11.el6 base 75 k
Transaction Summary
======================================================================================================================================
Install 11 Package(s)
Total download size: 8.1 M
Installed size: 16 M
Is this ok [y/N]: y
Downloading Packages:
(1/11): libXdmcp-1.1.1-3.el6.x86_64.rpm | 30 kB 00:00
(2/11): libXfont-1.4.5-3.el6_5.x86_64.rpm | 136 kB 00:00
(3/11): libXmu-1.1.1-2.el6.x86_64.rpm | 66 kB 00:00
————————————————————————————————————————————–
Total 1.3 MB/s | 8.1 MB 00:06
Running rpm_check_debug
Running Transaction Test
Transaction Test Succeeded
Running Transaction
Installing : libfontenc-1.0.5-2.el6.x86_64 1/11
Installing : libXfont-1.4.5-3.el6_5.x86_64 2/11
Installing : 1:xorg-x11-font-utils-7.2-11.el6.x86_64 3/11
Installed:
tigervnc-server.x86_64 0:1.1.0-8.el6_5
Dependency Installed:
libXdmcp.x86_64 0:1.1.1-3.el6 libXfont.x86_64 0:1.4.5-3.el6_5 libXmu.x86_64 0:1.1.1-2.el6
libfontenc.x86_64 0:1.0.5-2.el6 libxkbfile.x86_64 0:1.0.6-1.1.el6 xkeyboard-config.noarch 0:2.6-6.el6
Complete!
Create the system user and convert to vnc user by using following commands.
[root@linuxpcfix ~]# passwd linuxadmin
Changing password for user linuxadmin.
New password:
Retype new password:
passwd: all authentication tokens updated successfully.
[root@linuxpcfix ~]#
[root@linuxpcfix ~]# vncpasswd linuxadmin
Password:
Verify:
[root@linuxpcfix ~]#
Now time to start the vnc server
[linuxadmin@linuxpcfix ~]$ vncserver
You will require a password to access your desktops.
Password:
Verify:
xauth: creating new authority file /home/linuxadmin/.Xauthority
New ‘server.hostname.com:1 (linuxadmin)’ desktop is server.hostname.com:1
Creating default startup script /home/linuxadmin/.vnc/xstartup
Starting applications specified in /home/linuxadmin/.vnc/xstartup
Log file is /home/linuxadmin/.vnc/server.hostname.com:1.log
Verify the user’s home directory the vnc related files should be created.
total 24
drwxr-xr-x. 2 linuxadmin linuxadmin 4096 Oct 9 03:41 .
drwx——. 5 linuxadmin linuxadmin 4096 Oct 9 03:41 ..
-rw——-. 1 linuxadmin linuxadmin 8 Oct 9 03:41 passwd
-rw-rw-r–. 1 linuxadmin linuxadmin 1624 Oct 9 03:41 server.hostname.com:1.log
-rw-rw-r–. 1 linuxadmin linuxadmin 5 Oct 9 03:41 server.hostname.com:1.pid
-rwxr-xr-x. 1 linuxadmin linuxadmin 654 Oct 9 03:41 xstartup
[linuxadmin@linuxpcfix ~]$
Then open the vnc global configuration file and change the desktop environment as required.
# VNCSERVERS=”2:myusername”
# VNCSERVERARGS[2]=”-geometry 800×600 -nolisten tcp -localhost”
change To
# VNCSERVERS=”2:myusername”
# VNCSERVERARGS[2]=”-geometry 1200×800 -nolisten tcp -localhost”
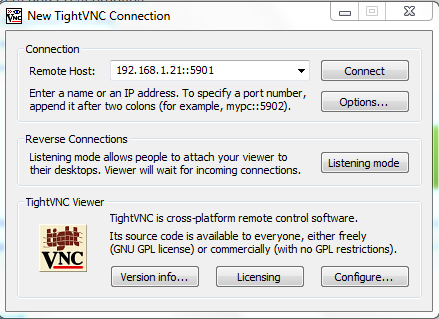
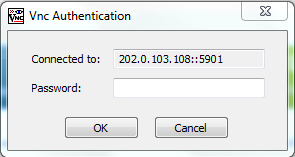
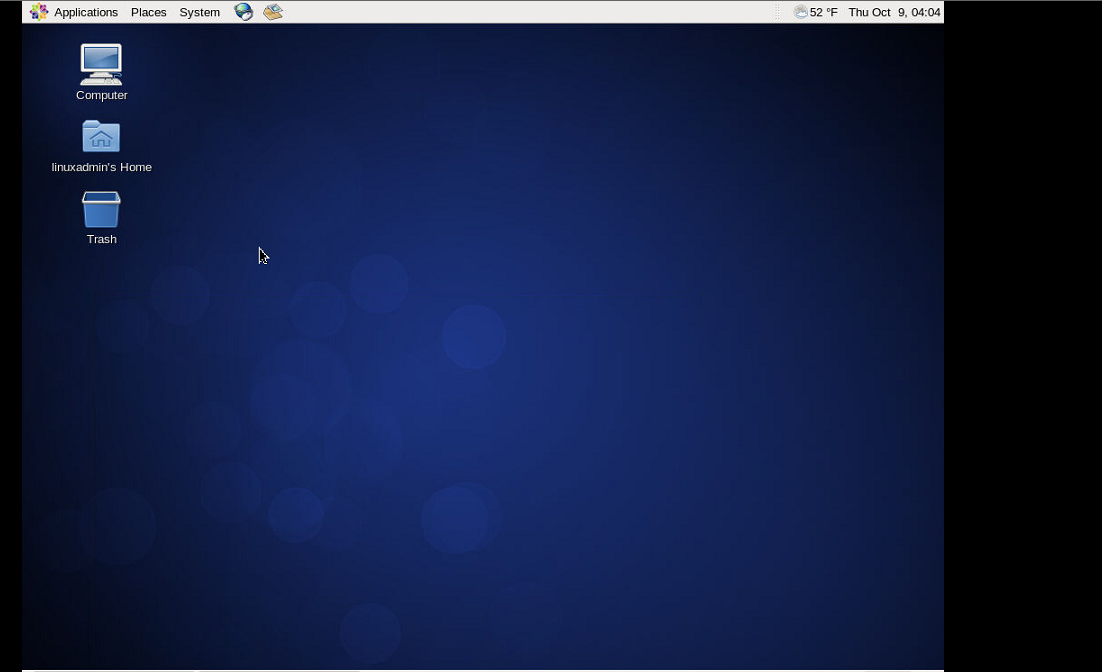
Finally install vnc client on your local system and access remote system followed by below images.
Enjoy!


